| Newly hatched brine shrimp,
or artemia, are used as first foods for most species of seahorse
young. The artemia should be enriched however with a HUFA
booster such as Selco. The newly hatched brine should be allowed
to age for 12 to 24 hours prior to enriching. When first hatched,
they do not have a complete digestive system and therefore
cannot be enriched. After the 12–24 hour period their
digestive tract is developed allowing them to take in the
enrichment. I have the best results enriching for 12 to 24
hours. I have 3 hatcheries setup, the first is to hatch the
cysts, the second to let them grow and the third to enrich.
If the brine is properly enriched good results can be achieved
with most seahorse species.
Another common problem is separating the shells once the
brine is hatched. The easiest and best method in my opinion
is decapsulation. Aside from eliminating the shell, decapsulation
sterilizes the cysts and can increase hatch rates if done
properly.
Decapsulation:
Materials needed:
- Brine shrimp net
- 2 tsp Artemia cysts
- 2 cups of luke warm water
- 2/3 cup of regular bleach
- Air pump and airline tubing
- Cloths Pin (to hold airline)
- Sodium Thiosulfate (Dechlorinator)
Removing the outer shell from an artemia cyst has many benefits.
First of all it prevents any unwanted contaminants (hydroids,
etc.) from entering your rearing system. Secondly there is
no need to deal with the shells after the artemia hatches,
and last but not least the newly hatched artemia are much
higher in nutritional value because they haven't had to use
all their resources to break out of the shell. The following
method is the one we use and it can be scaled up to however
much you need to hatch. The decapsulated cysts can be stored
in the fridge for about a week and still work well.
Step 1:
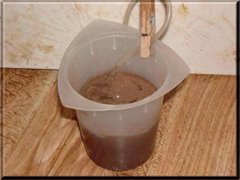
Add 2 cups of luke warm water to a suitable container (a
jar or plastic container work well). Clip the airline to the
edge and make sure that it is all the way to the bottom of
the container, so it really bubbles the water. You want the
cysts to stay in motion. Add 2 teaspoons of cysts, and wait
one hour, washing the cysts off the side occasionally with
an eye dropper (just suck up a little water from the container).
The cysts hydrating
Step 2:
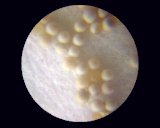
After one hour the cysts are hydrated. The following images
show the difference between dehydrated and hydrated cysts:
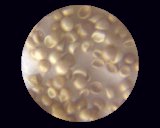
Dehydrated |
Hydrated |
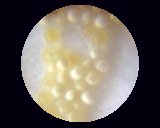
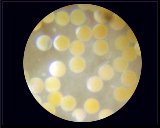
At this point we are ready to decapsulate. Add 2/3 cup of
bleach to the container and watch closely. There will be three
color changes. First they are brown, then light gray, then
orange. When they reach the orange stage they will need to
be immediately poured in to the brine shrimp net and rinsed
with cold water. Pour dechlor over them as well to neutralize
the bleach. An easy way to check the cysts is to pour a little
through the brine shrimp net and see what they look like.
You want to see mostly orange, but a few gray ones. If you
over bleach them they will not hatch, so it's better to stop
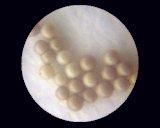
the reaction at this point. The following images show the
color change at 30 times magnification:
| A few orange cysts |
About half and half
|
The cysts after rinsing
|
The amount of bleach can be increased or reduced to increase
or decrease the speed of the process.
Step 3:
After thoroughly rinsing the cysts until no odor of bleach
remains, squeeze the net to remove as much water as possible
and place them into a sealed container. Place this in the
fridge and use what you need daily. The cysts should last
at least a week.
Hatching:
Hatching artemia takes about 24 hours. After they are hatched,
we give them another 24 hours to reach the next stage in their
development, called the Instar II stage. At this point the
artemia is capable of ingesting food or nutrients. We enrich
all ours with a HUFA booster such as Selco. This is necessary
as seahorse fry generally doesn't do well on unenriched artemia.
We use three "hatchers". One is where the actual
hatching takes place, the next is a holding "hatcher"
to wait until they are at Instar II, and the third is the
enrichment "hatcher".
If you use decapsulated cysts, you must have A LOT of bubbles
in the hatcher. Decasulation removes the shell which in turn
takes away their ability to float. If you don't have enough
circulation in the hatcher, you'll end up with clumps of cysts.
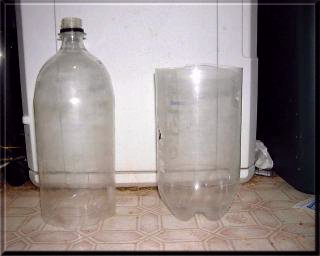
Building a Hatcher:
A simple hatcher to use is constructed of two 2 liter pop
bottles. Cut the top off of one bottle and the bottom off
another as shown below:
Next, drill a 1/4" hole through the cap, run the airline
about 1/2" in and seal with epoxy on the outside. Epoxy
is available at most hardware stores. Drill a hole through
the bottom half of the bottle for the airline to pass through,
and put the two halfs together.
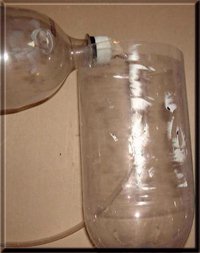
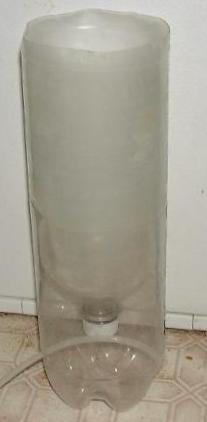 The completed hatchery
 Enrichment:
To enrich adult artemia (brine shrimp) simply place the enrichment
media, being algae paste, Selco, etc. in with the shrimp.
For adult shrimp this can be done at any time by simply feeding
the tub they're stored in. Do not, however, do this with a
HUFA booster such as Selco. This will spoil the water and
may kill all your brine. To enrich with a booster, use a seperate
container such as the hatcher described above.
To enrich newly hatched artemia, place the enrichment media
in the hatcher after the shrimp are 24 hours old. We enrich
for 12–24 hours.
|